The number of items in the game and skills is to be endless in Minecraft.
There are numerous Minecraft biomes as well as a myriad of spells as well as a variety of distinctive Minecraft items.
The game comes with features that provide you with unique advantages, but nothing can compare to the powerhouse Minecraft beacon.
It’s a surprising under-used tool that gives you the same capabilities as many of the most powerful Minecraft modifications.
However, with this power comes a challenging crafting recipe.
However, don’t worry about it we’re here to provide you with everything you require about beacons and the best way to make use of beacons for use in Minecraft Java or Bedrock versions.
Let’s look at how to create and use beacons in Minecraft.
Make and Use a Beacon in Minecraft 2023
There’s a lot involved in crafting and using beacons.
To simplify things, we’ve broken down our tutorial on Minecraft beacons into easily accessed distinct sections.
You can use this table to explore the subject you like.
What is a Beacon in Minecraft and How Is It Useful?
The way to describe it is in general Minecraft terms Beacons is an object that functions as an illumination source.
However, unlike normal light sources, beacons possess added powers.
The initial introduction players typically have to the Beacon is typically within The End dimension.
It is a powerful tool that serves as the source of the healing power for Ender Dragon. Ender Dragon.
When a player is activated beacons give the status effect. These apply to everyone who is around the beacon.
The advantages and capabilities include speed and jump boosts, haste regeneration, resistance, and the ability to strengthen.
These are useful during boss battles and can make multiplayer more enjoyable.
Items Required to Make a Beacon
In contrast to building a boat in Minecraft, beacons aren’t as easy to build. To build a beacon, you’ll require the following materials:
- 5 glass blocks
- 3 Obsidian Blocks
- A Nether star
How to Get Glass Blocks
The only way to get glass blocks is to search for breaks, collect, and break the blocks using a tool that is enhanced with Silk Touch enchantment.
To make it easier take the steps listed below to create glasses in Minecraft.
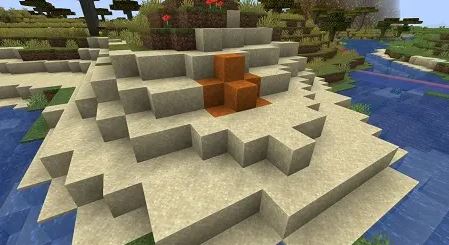
1. Begin by collecting sand blocks. They’re easy to break and you might even be able to collect red sand blocks instead of the usual ones.
We require a total of five blocks of sand also known as red sand to prepare our recipe.
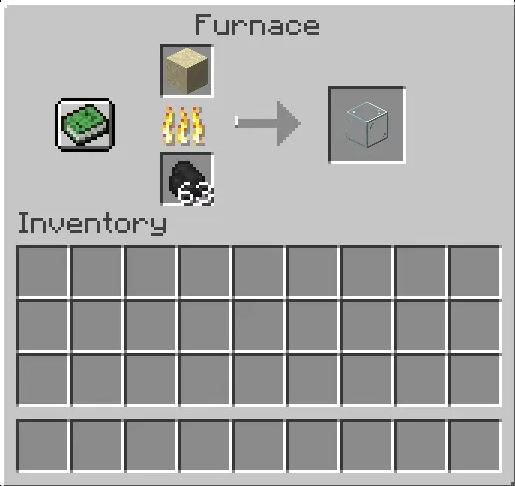
2. The next step is to melt the sand blocks. Put sand blocks and any other fuel into a standard furnace. In just a few seconds the sand is going to change to glass.
Alternately, you could trade emeralds to villagers to obtain glass blocks. In general, they will give you four glass blocks for an emerald.
This is if you can find the village that can provide the required jobs and trades.
How to Get Obsidian Blocks?
Obsidian is among the most difficult block to extract in Minecraft. It is typically located in areas in which water and lava sources are combined.
It is also found in chest loots, making it a bit more straightforward.
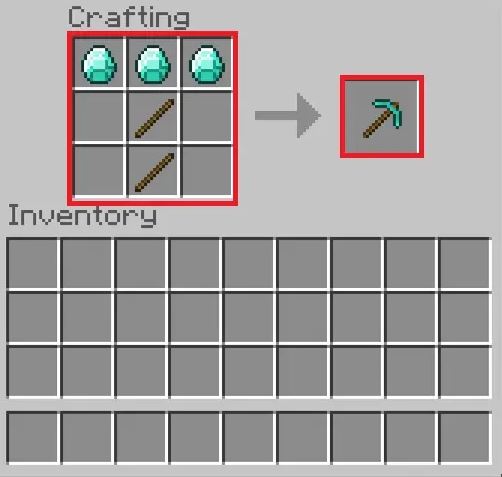
1. Before we can even begin to make obsidian, you will require a diamond pickaxe to extract obsidian.
To make a diamond-shaped pickaxe, you’ll have to mix 3 diamonds and two sticks of wood with the crating table within Minecraft.
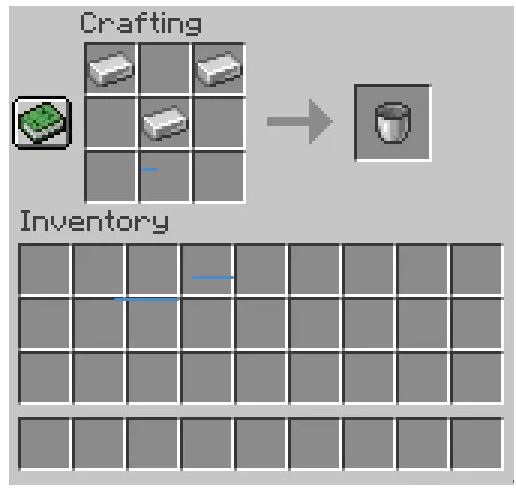
2. The next step is to create an iron bucket by using three iron blocks and the recipe below on your table for crafting. A bucket can make it easier to craft obsidian.
3. It’s now time to start looking for water sources and lava. Water sources are easy to locate, so search first for a lava source.
In general, you can find lava beneath the ground while mining or even as an underground lavafall.
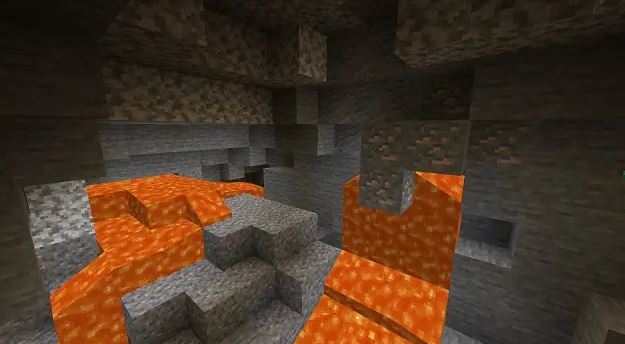
4. Then, once the bucket is fitted, right-click on the lava to take it out and transport it to the source of water. It is possible to do this with several buckets to speed up the process.
Once you’ve reached the water source that has the lava, right-click on the water and drop the lava into it.
The only thing you have to do now is to mine obsidian blocks. This is the place where our diamond pickaxe can be of great help.
![]()
How to Get a Nether Star?
In general, you can get the nether star by killing a Wither. However, the issue is the fact that it’s not easy to find.
Like other mobs, you cannot find it or go through a portal to get to it. Therefore, let’s get started by spawning with the Wither In Minecraft.
1. To create a Wither we require four soul grains of sand also known as soul soil. In addition three Wither skulls that are skeletons. All of them can be located inside the Nether realm.
Thus, begin by making a portal to the Nether realm by putting obsidian blocks according to the following order. You can make it active by activating it using “flint & steel”.

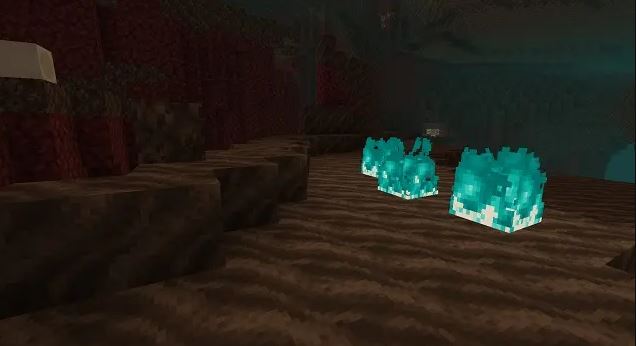
2. When you are in the Nether begin looking for soul soil, or soul sand. The blue flames of the soul are an excellent indication of both.
These blocks can be mined as dirt blocks do in the realm of overground. We need four soul soil blocks or sand blocks to summon the Wither.
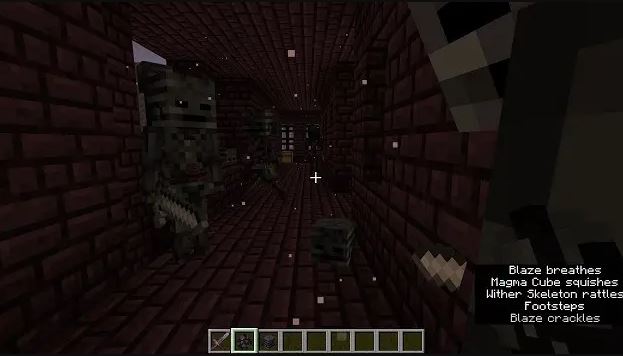
3. You must now locate a nether fortress. It is a popular place to spawn Wither Skeletons.
It is necessary to eliminate the Wither Skeletons until we’ve found three Wither Skeleton skulls. However, keep in mind that not every Skeleton leaves a skull.
4. Finally we have four blocks of soul sand or soul soil and three skulls from the Wither We are now prepared to summon the legendary Wither.
It’s a formidable Minecraft boss who can fly and do quite a bit of damage.
Therefore, ensure that you obtain the most powerful bow and enchantments before calling the Wither.
For those who are new to the game, it may require more than one try to defeat the Wither however, it will leave the footprints of the Nether Star after it’s killed.
![]()
Crafting Recipe for a Minecraft Beacon
With all the materials needed to create the Beacon, All we need to do is to open a crafting table and start.
However, activating the beacon within Minecraft is another lengthy journey.
After that, levelling it will require a whole different approach. Make sure to stay with us until the end to get all the information about beacons.
![]()
To make it easier start by opening the table and adding three Obsidian blocks to the lower row of the table. After that, place your Nether Star in the middle.
In the end, you can place glass blocks on the top row and along the sides that of Nether Star. You have created a beacon in Minecraft.
How to Break or Collect a Beacon?
Being able to break up the Beacon in its entirety after placing it can be beneficial to move it from one spot to another.
To destroy the beacon, you can utilize any game-related tool. The tool will explode whenever mined.
So take care. The majority of players destroy beacons by using an explosion to allow them to be dropped as an item, without any risk.
How to Activate a Beacon in Minecraft?
If you think that the most difficult portion of the tutorial is completed, you’re right.
However, that doesn’t mean it won’t take a long amount of time for the beacon to be activated in Minecraft.
It is typical for players to take longer to activate beacons than they do the time it takes to create them.
To activate the beacon, it must satisfy the following conditions:
- A beacon must not be obscured by any block that blocks its light from reaching into space. However, transparent blocks such as glass can be put over them.
- Any Minecraft beacon is only effective when it’s placed over the pyramid structure. The pyramid’s size determines what power level of the beacon.
Let’s go over the second rule to understand the significance of beacon pyramids and how they impact the beacons you use in Minecraft.
What are Beacon Pyramids in Minecraft?
As the name suggests, Pyramids are structures made of blocks that have several elevated levels. Based on the height they are available in four different kinds of beacon pyramids.
The higher the pyramid, the more power and a greater area of coverage. However, every new stage of the Pyramid requires increasing blocks, too.
Additionally, any blocks that are missing within a pyramid will disable your Beacon completely.
Types of Pyramids in Minecraft
The kinds are categorized by the type of blocks used or the dimensions of pyramids.
In addition to the block size, how big the beacon pyramid is can affect the number of power boosters you’re receiving.
The smallest can be 9 blocks in size, while the biggest beacon pyramid could include more than 164 blocks. Let’s look at how each differs.
Level 1: Beacon Pyramid
The bare minimum Beacon pyramid is just one floor high. It can be constructed by arranging 9 blocks in a 3×3 square shape.
On the middle block, place the beacon in otoe it activates.
A Basic pyramid grants you speed and haste boosters. A speed boost can help players walk quickly, and haste helps you mine more efficiently.
Together they can help you get everything else you’ll need to move up the pyramid.
![]()
To make the blocks you wish to build You will require at least 81 pieces of the substance. i.e. to create nine Iron blocks, you’ll require an iron ingot.
A Beacon level 1 will last for around 20 blocks in all directions.
Level 2: Beacon Pyramid
The next thing we’ll see is a beacon pyramid with two floors. The top floor remains an area of 3×3 squares. However, the bottom floor is now a 5 5-square.
The level 2 beacon pyramid has 34 blocks made from 304 components. This level will receive new enhancements to the ones already in place.
![]()
The latest power boosts come with a jumping boost and resistance.
Jump boost allows you to jump higher than normal, and resistance decreases the amount of damage that comes to the player.
Both are beneficial to avoiding mobs and winning fights. The range of these levels’ boosts is 30 blocks.
Level 3: Beacon Pyramid
The next thing we’ll see is a beacon pyramid with two floors.
The top floor remains an area of 3×3 squares. However, the bottom floor is now a 5 5-square. The level 2 beacon pyramid has 34 blocks made from 304 components.
This level will receive new enhancements to the ones already in place.
![]()
The latest power boosts come with a jumping boost and resistance.
Jump boost allows you to jump higher than normal, and resistance decreases the amount of damage that comes to the player.
Both are beneficial to avoiding mobs and winning fights. The range of these levels’ boosts is 30 blocks.
Level 4: Beacon Pyramid
This is the highest level in the pyramid of beacons. It needs a massive amount of blocks: 164, to be exact.
They are made of more than 1476 different materials. The boost you receive by completing this level lasts 50 blocks.
It gives players a recovery II boost which boosts the effectiveness of regeneration to gain their health back quicker.
![]()
The lowest level in this pyramid the size of a lower level of the pyramid is an9 9 square.
In a sense, it is possible to put a Level 3 pyramid just above it. The second layer down is a 7×7 square.
The second layer On top is a 5 x 5 square. In the final layer, there is a 3×3 square.
Due to the number of blocks involved this is one of the most tedious structures in the game of survival Minecraft.
Beacon Types Based on Material Used
After you have a good understanding of the levels of the beacon pyramid there is a myriad of options to construct these.
You can build the pyramid using iron blocks, diamond blocks, and gold or emerald blocks.
You can also make a pyramid using nephrite blocks. Remember to keep your mind in the back of your head that you could combine them and the beacon will continue to work.
![]()
Their functionality is not affected by the blocks that you employ to build your beacon pyramid.
Therefore, for gamers, blocks that are used are generally chosen to be aesthetic.
Sometimes, it depends on the availability of the blocks. So feel at liberty to create beacon pyramids.
How to Effectively Use a Minecraft Beacon?
If you’ve learned the steps to create a beacon using Minecraft It’s time to move on to your next steps.
Let’s take a look at the features available and the ways you can utilize beacons in Minecraft.
As you’ve already guessed, every level on the beacon pyramid grants new capabilities that you can utilize.
However, the boosts aren’t activated by default, so we need to find out how to activate the boosts.
1. If the beacon emits an illuminating beam then, walk up to the beacon. After that, right-click on it, or press the second action button.
![]()
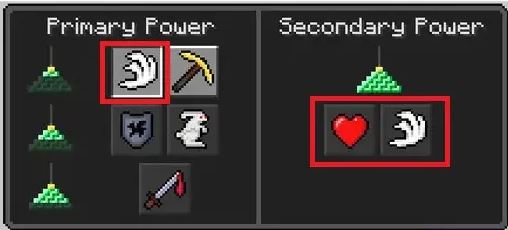
2. The beacon comes with a menu of power. It is possible to see all the primary powers that grow as you go up levels on the left.
On the other hand, the right side is the one with the second power, regeneration, which is activated when you build the level 4 pyramid.
![]()
3. For now, to utilize these abilities, players can instantly activate just one power once and increase its strength of it.
You can also choose to remain at level 1, but then activate regeneration with it. You can choose the power you would like to turn on using clicking on them.
4. If you’re satisfied with your choice, it’s now time to start your boosts. To do this, you must provide to the Beacon one of these:
iron ingot, diamond ingot, gold, emerald, or nephrite. It can be fed by placing it into the block that is empty just under the column of electricity.
After that, you must hit the green tick mark for it to be activated.
You can modify the power, or even activate more than one by repeating the procedure with different power sources separately.
![]()
In the beginning, it is possible to apply the effects for 9 minutes. After that, you’ll get 2 seconds of boosts per level.
The boosts are applied repeatedly each time for four seconds for as long as you’re within the vicinity of pyramids.
If a player is beyond the reach of the pyramid that is beacon-like, they will only receive 5-17 seconds of boost.
In contrast to increases, the beam does not affect the players directly.
It is possible to change the colour beams by placing windows or stained glass over the beacon.
Colour of the beam changes based on the colour that the blocks that are placed on the top. You can make it multi-coloured by using stained glass.
It is possible to do this by placing different colours of stained glass on top of each other.
But, remember that the colours may mix somewhat, which will result in different colours, based on the order of your glass’s position.
![]()
Beams can also function within the Nether and can penetrate the bedrock. However, using any other opaque or translucent block prevents the beam from working.
For Minecraft’s Java edition, you’ll be able to view them 1342 blocks away with a rendering the distance is 16 blocks.
But, the Minecraft Bedrock edition has a maximum of 64 blocks. If you take it vertically, it will go toward the top of the universe at 1048 blocks high.
Get Special Powers with Beacon in Minecraft
Now you are well-versed on how to design and make and use a Beacon to use in Minecraft.
Be sure to ensure you’re using the Bedrock wither won’t be able to frighten you, as it’s stronger than the frightening Warden that is coming in the coming Minecraft 1.19 update.
In terms of the intricate procedure to activate the beacon, the Minecraft distribution of ore guide will help you discover the necessary materials in no time.
If you don’t use beacons for your survival, however, it’s an essential aspect of achieving some of the top Minecraft home ideas.
In the meantime, tell us what kind of beacon pyramid you employ to create your own Minecraft world by leaving a comment below.
👉 Visit our Site for more information:Customerfeedbacks.info
Beacon in Minecraft – FAQ
A beacon is a type of block in Minecraft that sends out a strong light beam and helps players nearby.
You need 3 obsidian blocks and 5 glass blocks to make a light. Make a “V” with the obsidian blocks and put the glass blocks on top.
You will require a tower constructed of mineral blocks such as iron, gold, diamond, or emerald in order to power the beacon. How strong the effects are will depend on how big the stack is.
Put a light on top of a pyramid made of mineral blocks to turn it on. Then, right-click on the light and choose the effects you want from the menu that appears.
You can change the benefits you can use by putting different kinds of mineral blocks in the pyramid. The main result is based on the type of mineral block used as the beacon’s base.
Speed, Haste, Resistance, Jump Boost, Strength, and Regeneration are the main benefits. With a larger pyramid, each effect can reach a higher level.
Once you have a valid pyramid, you can get extra benefits like faster mining or more damage from your attacks.
You can make a beacon’s effects reach farther by building a bigger tower with more mineral blocks.
A fully charged beacon extends its effects up to 50 blocks in all directions, creating a total diameter of 101 blocks.
No, the benefits of having more than one beacon do not add up. But if you are close enough to more than one signal, you can use them all at the same time.